Ditch Expensive SEO Tools: Automate Keyword Research with n8n and DataForSEO
In the rapidly evolving world of SEO, AI-generated content now dominates the narrative. First, OpenAI offered an AI-driven search alternative, and now we have AI Overview features at the forefront of Google SERPs. Needless to say, things are changing pretty quickly.
However, certain things in SEO haven’t changed much. One of them is the need for keyword research. It’s 2025, and we still need to know what people are searching for to create relevant content, whether an article for a website or a script for a YouTube video.
In this YouTube video, Wayne Ergle, the owner of the AI automation and solutions agency WebXco.ai, shows how you can create an innovative keyword research tool using the n8n workflow platform and DataForSEO Labs API.
Kudos to Wayne for sharing this brilliant automation! For our part, we reverse-engineered his solution and did our best to ensure you have a working tool when you reach the end of this Help Center article.
Let’s jump straight to it!
Step 1: Getting started with DataForSEO
First, you’d have to register an account with DataForSEO to get your API credentials. You’ll get $1 to your account, which is enough to create and test your solution.
You can learn the ropes of using DataForSEO in this kickstart guide>>
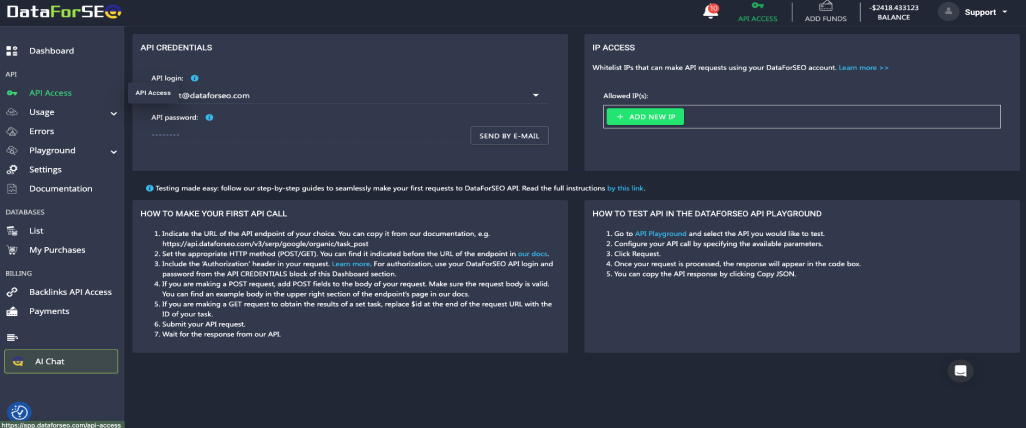
DataForSEO uses basic authentication, so you’ll need an API login and password to access the service. You can find your API login and password in the API Access section of your DataForSEO Dashboard. Your API login is the email address you used when creating an account, while the API password is automatically generated.
Leave the “Allowed IP(s)” field blank because the n8n service can use many different IP addresses to make API requests.
Then, you may encode your API credentials in Base64 and use them in the Authentication string in the following steps. However, we will be using Basic Authentication in the following steps, so it’s unnecessary.
Step 2: Getting started with n8n and Google Sheets
n8n.io is one of these popular low-code automation platforms that allow teams to connect multiple apps into a single automated workflow. Unlike other platforms, though, n8n features a visible source code, is available to self-host, and allows adding custom functions, logic, and apps. So, it’s not surprising that Wayne picked this platform for his keyword tool.
Upon signing up to n8n, create a project in the left-hand menu and set up a workflow.
Now, let’s start building our keyword research tool – that’s where the fun begins.
1. Create the manual trigger.
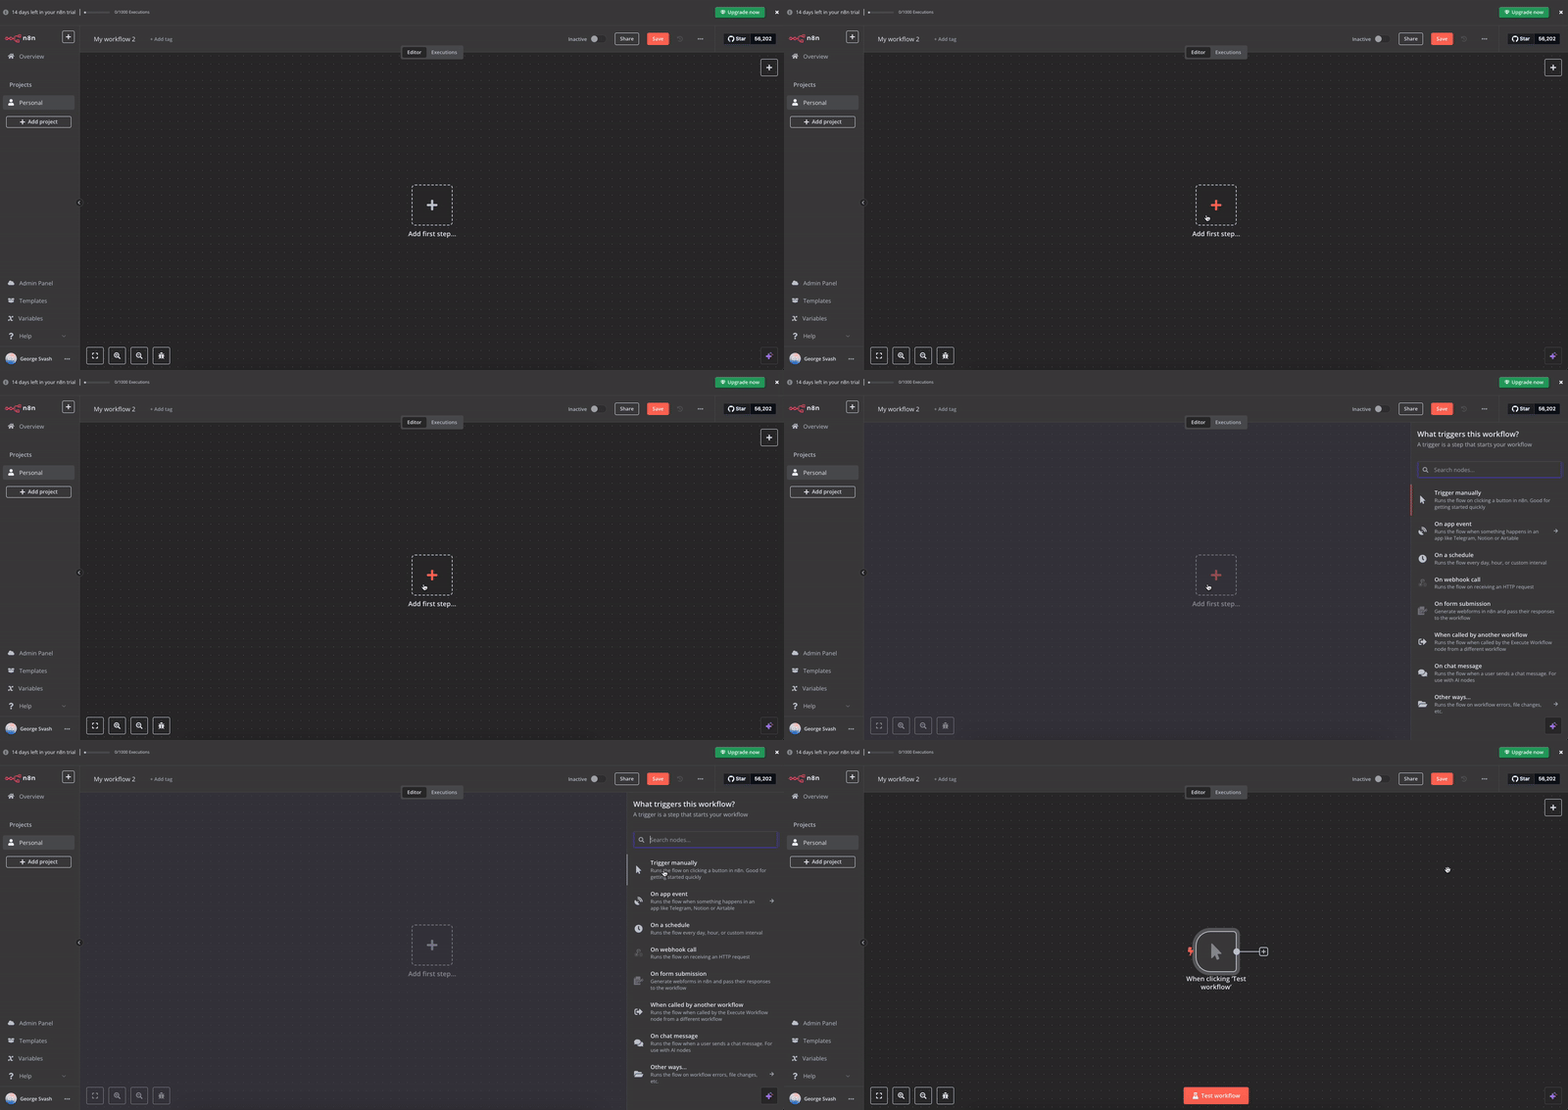
There are a few ways to launch an app in n8n, but the manual trigger is the optimal solution for non-recursive workflows. Click on “Add the first step…” in the middle of the screen and select “Trigger Manually.” Note that there can be only one trigger in a single workflow.
2. Set up the input parameters.
For initial setup, create the Google Sheets action from the right-hand menu. Wayne suggests obtaining input parameters for keyword research from the Google Sheets template, a copy of which you can get here.
Now, there’s a little caveat: you must connect your n8n credential to Google services and enable Google Sheets API in your Google Cloud account. Fortunately, n8n has a very informative article on this topic, so we do not need to describe the entire process here.
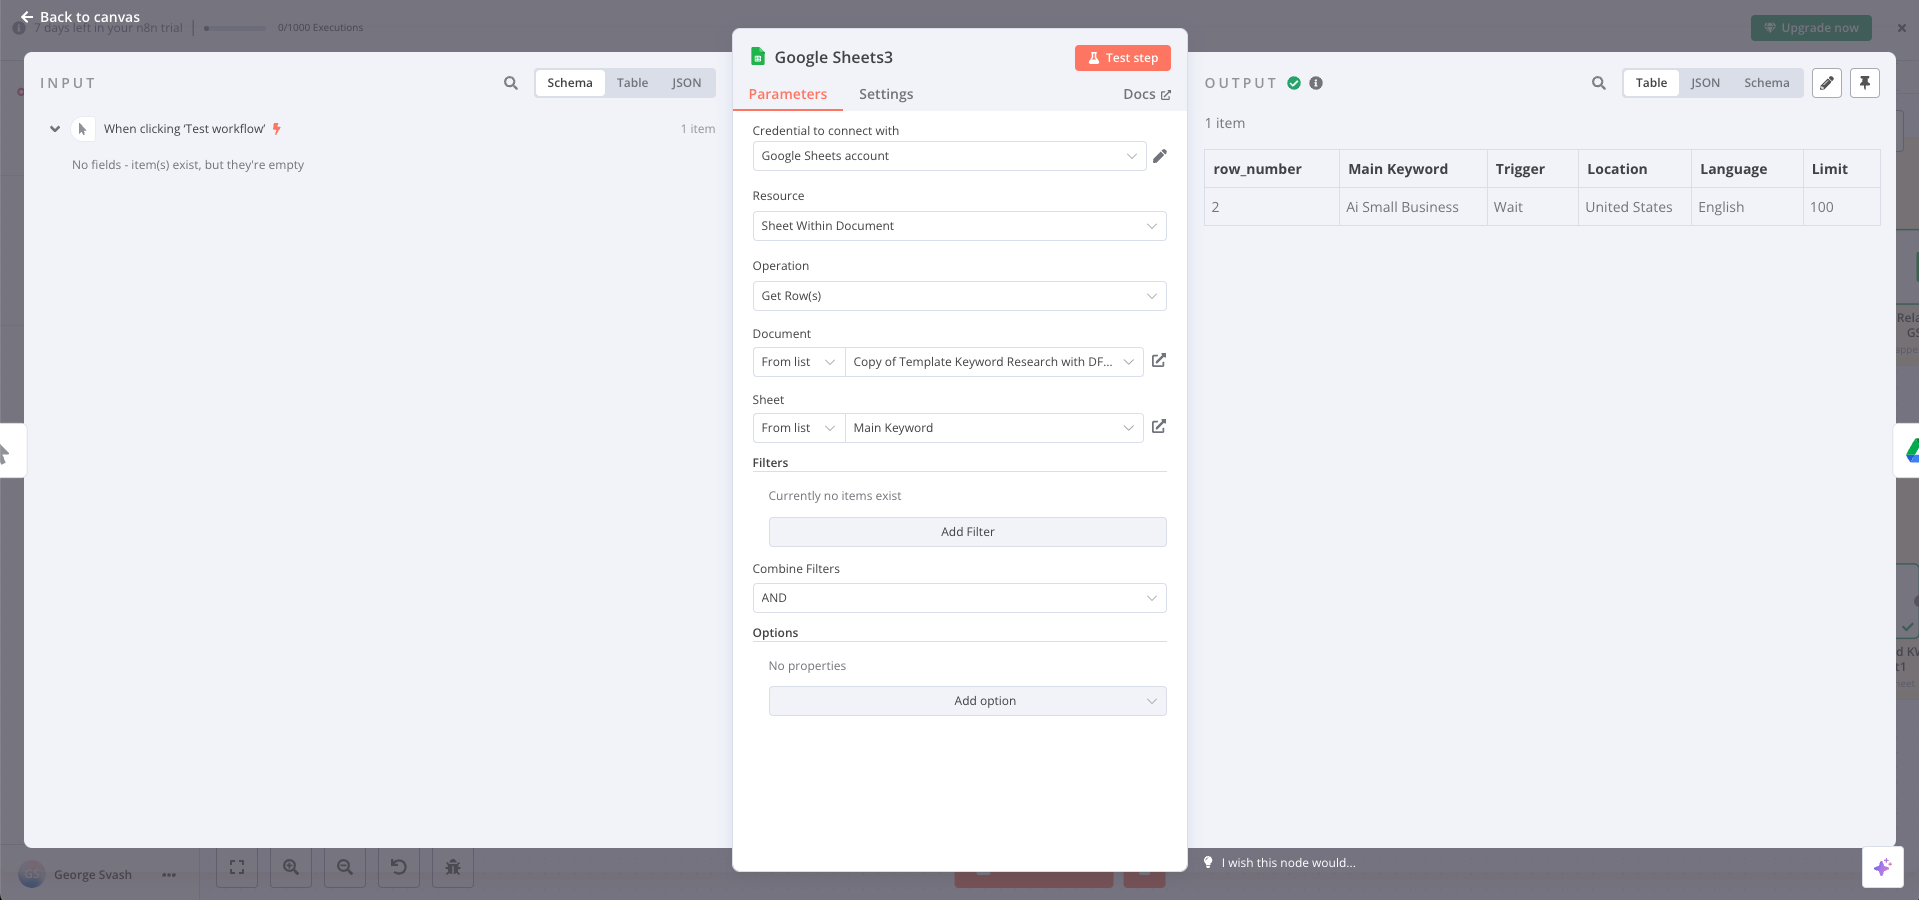
After connecting n8n with your Google account, fill out the forms in the workflow action you created. Select the credentials and set the “Resource” to “Sheet within Document.” Then, you’d want to “Get Row(s)” from the Google Sheets template you should’ve already copied to your Google Drive.
Your setup should look similar to the example below.
3. Automatically create a new folder for the results.
It’s always a good idea to start the SEO process with some structure. In this setup, a new folder for keyword research results will be generated automatically every time you run this tool.
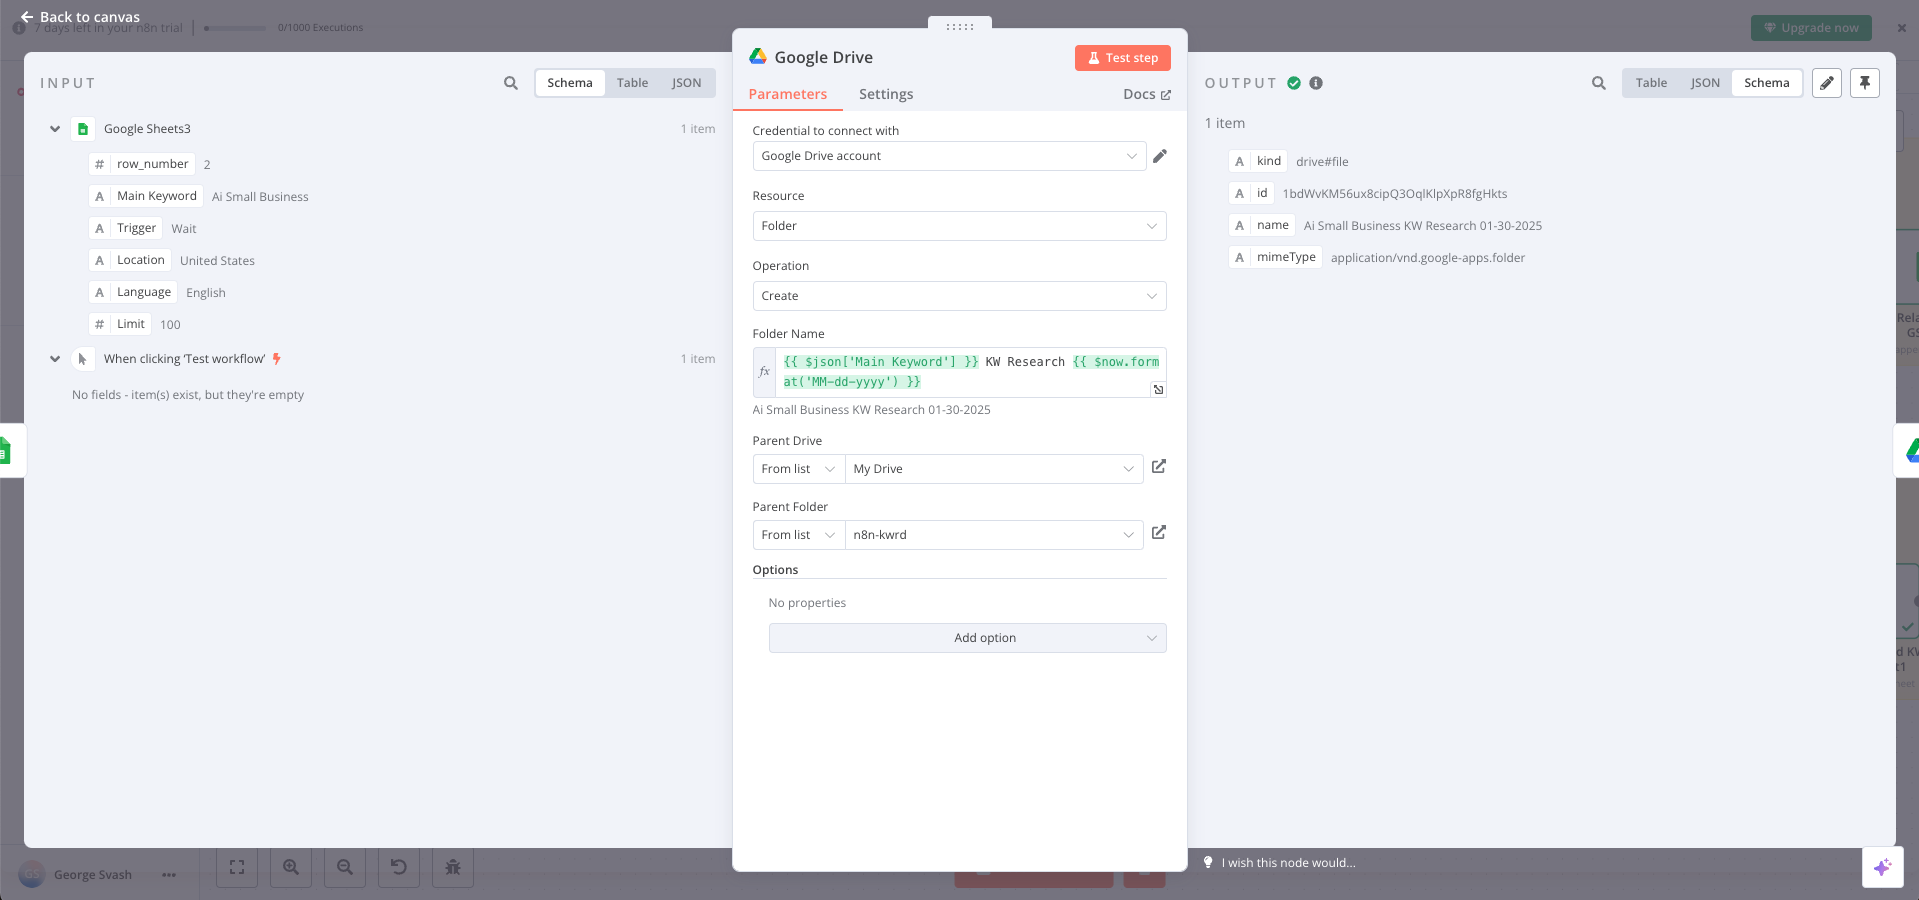
To do that in n8n, add a Google Drive action and connect it to your Google Drive account. Choose “Folder” in the Resource parameter and “Create” in the Operation.
Then, specify the name of the folder. For example, the following expression will generate a name with the seed keyword and creation date:
{{ $json['Main Keyword'] }} KW Research {{ $now.format('MM-dd-yyyy') }}
After that, just specify the parent Drive and parent folder and scroll down to the next step.
4. Copy your Google Sheet template into the folder.
Creating a folder for the results isn’t enough – you’d need a Google Sheet to store all the keyword ideas. To do just that, we’ll set n8n to automatically copy your template to the folder created in the previous step.
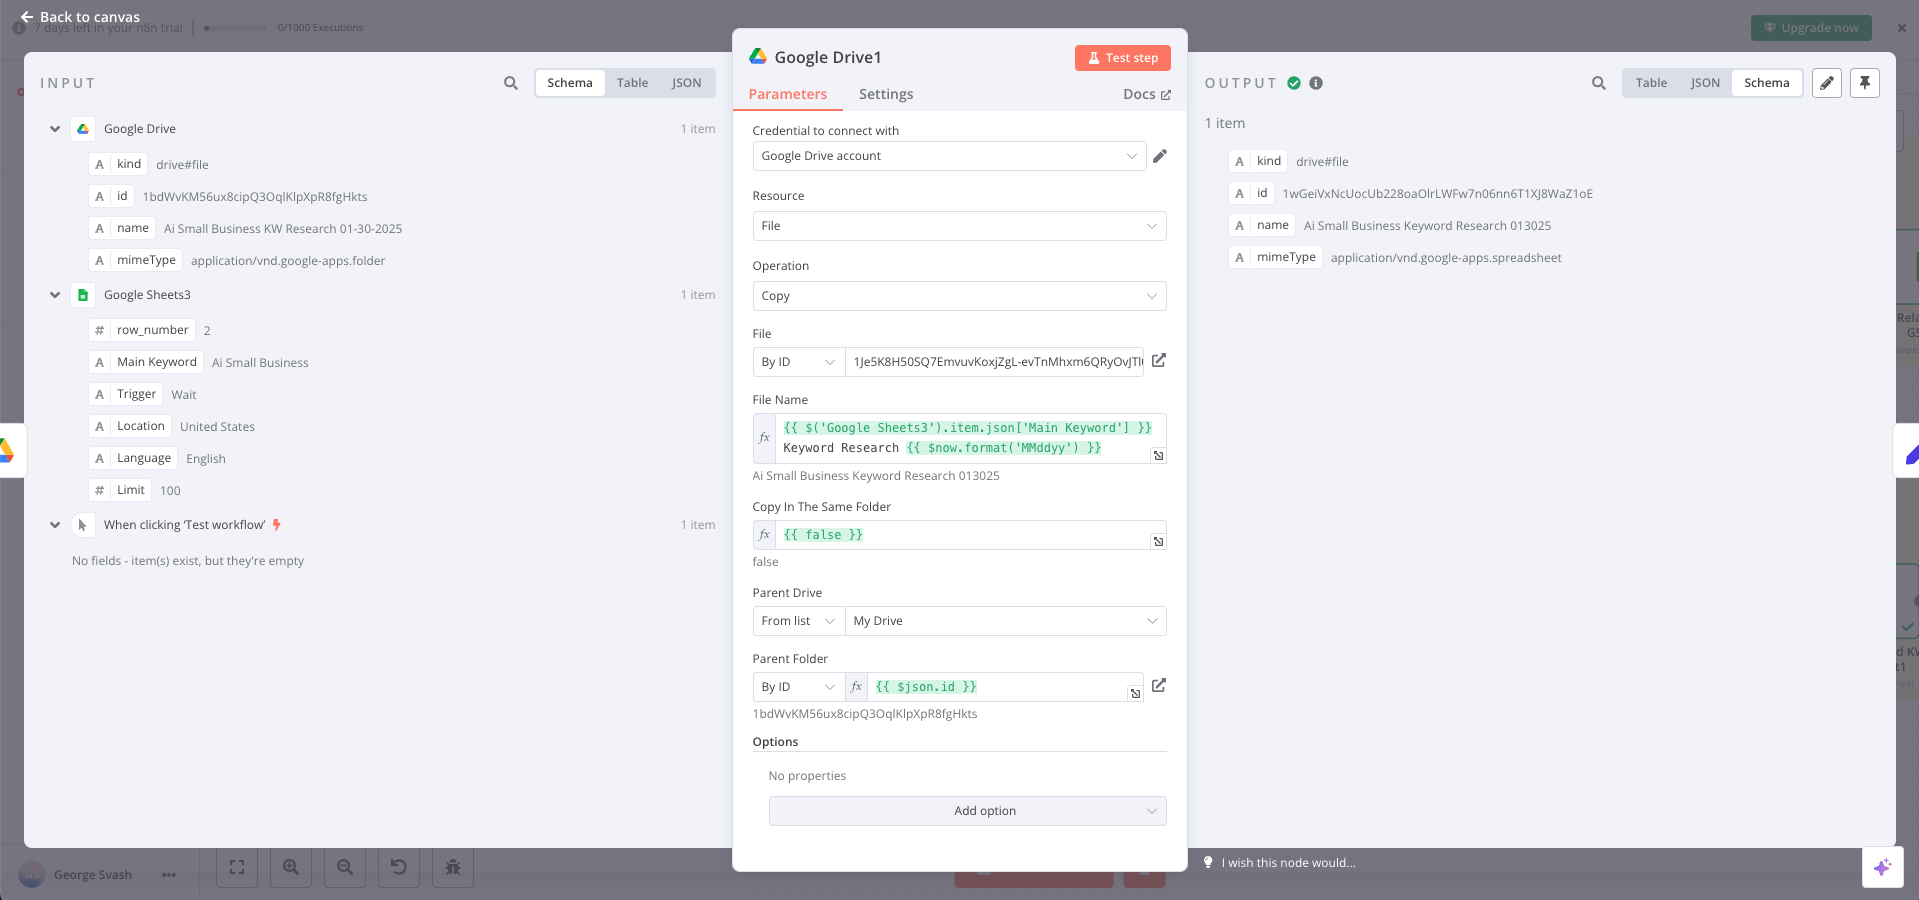
Create another Google Drive action, but this time, select “File” in the “Resource” field and “Copy” in the “Operation.” Then, input the ID of the file to copy and put down the script to name the final file.
{{ $('Google Sheets3').item.json['Main Keyword'] }} Keyword Research {{ $now.format('MMddyy') }}
Next, indicate you don’t want to copy it in the same folder by specifying {{false}} in the corresponding field and indicate your Drive in the “Parent Drive.” The parent folder can be specified with {{ $json.id }}.
5. Set main fields.
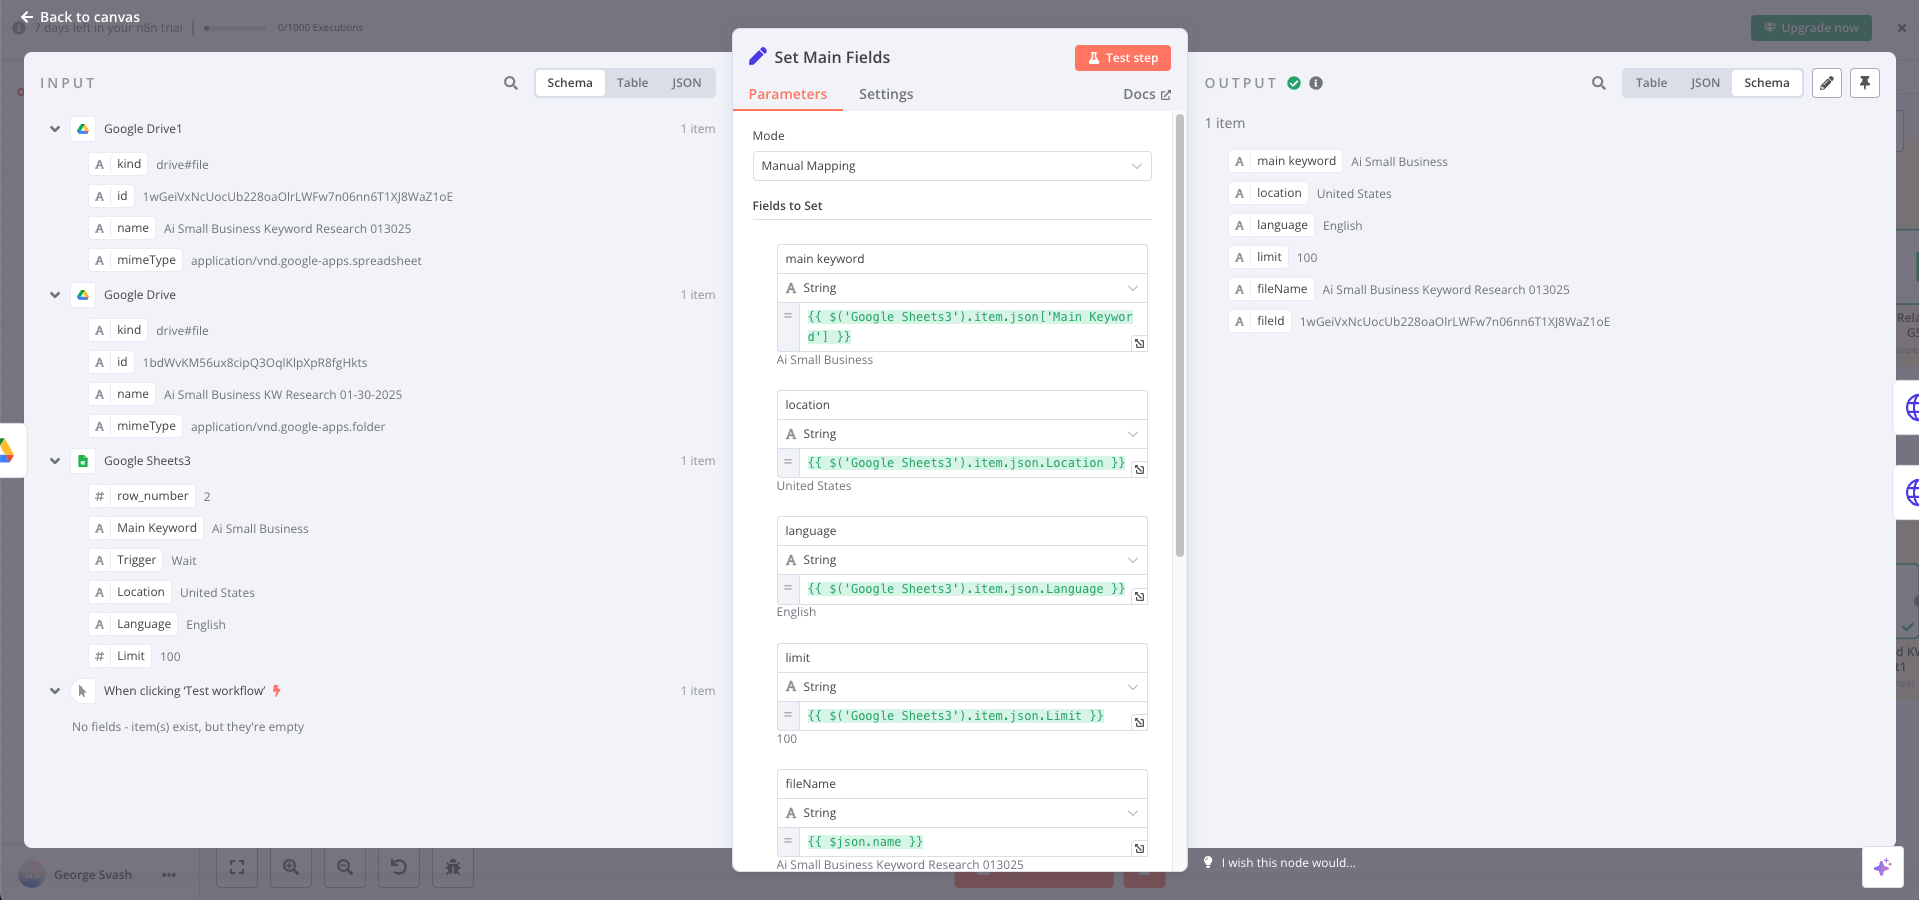
At this point, you should already have the Google Drive folder and Google Sheets for obtaining keyword research results. What’s left is to pinpoint the fields that will be used for sending requests to DataForSEO APIs in the following steps.
Select “Data Transformation” in the “What happens next” menu and pick “Edit Fields.” In the created node, set the mode to “Manual Mapping” and set the fields that would be used to make API requests: main keyword, location, language, and limit.
n8n offers a user-friendly interface, so you can just drag and drop the fields you need from the left side of the node’s window.
Step 3: Get Related Keywords
So you’ve set up a connection between your Google Drive and n8n platform. You’ve set up the input parameters for keyword research and assigned the storage for the results. What’s next?
In this step, we’ll show you how to make a request to the Related Keywords endpoint of DataForSEO Labs API and finally get your keyword ideas to the Google Sheet.
1. Connect to DataForSEO Related Keywords.
After setting up the folder and sheets in Google Drive, it’s time to ensure proper data delivery. DataForSEO currently doesn’t offer direct integration with n8n (although this is about to change shortly), so we’ll have to create an HTTP request in the workflow.
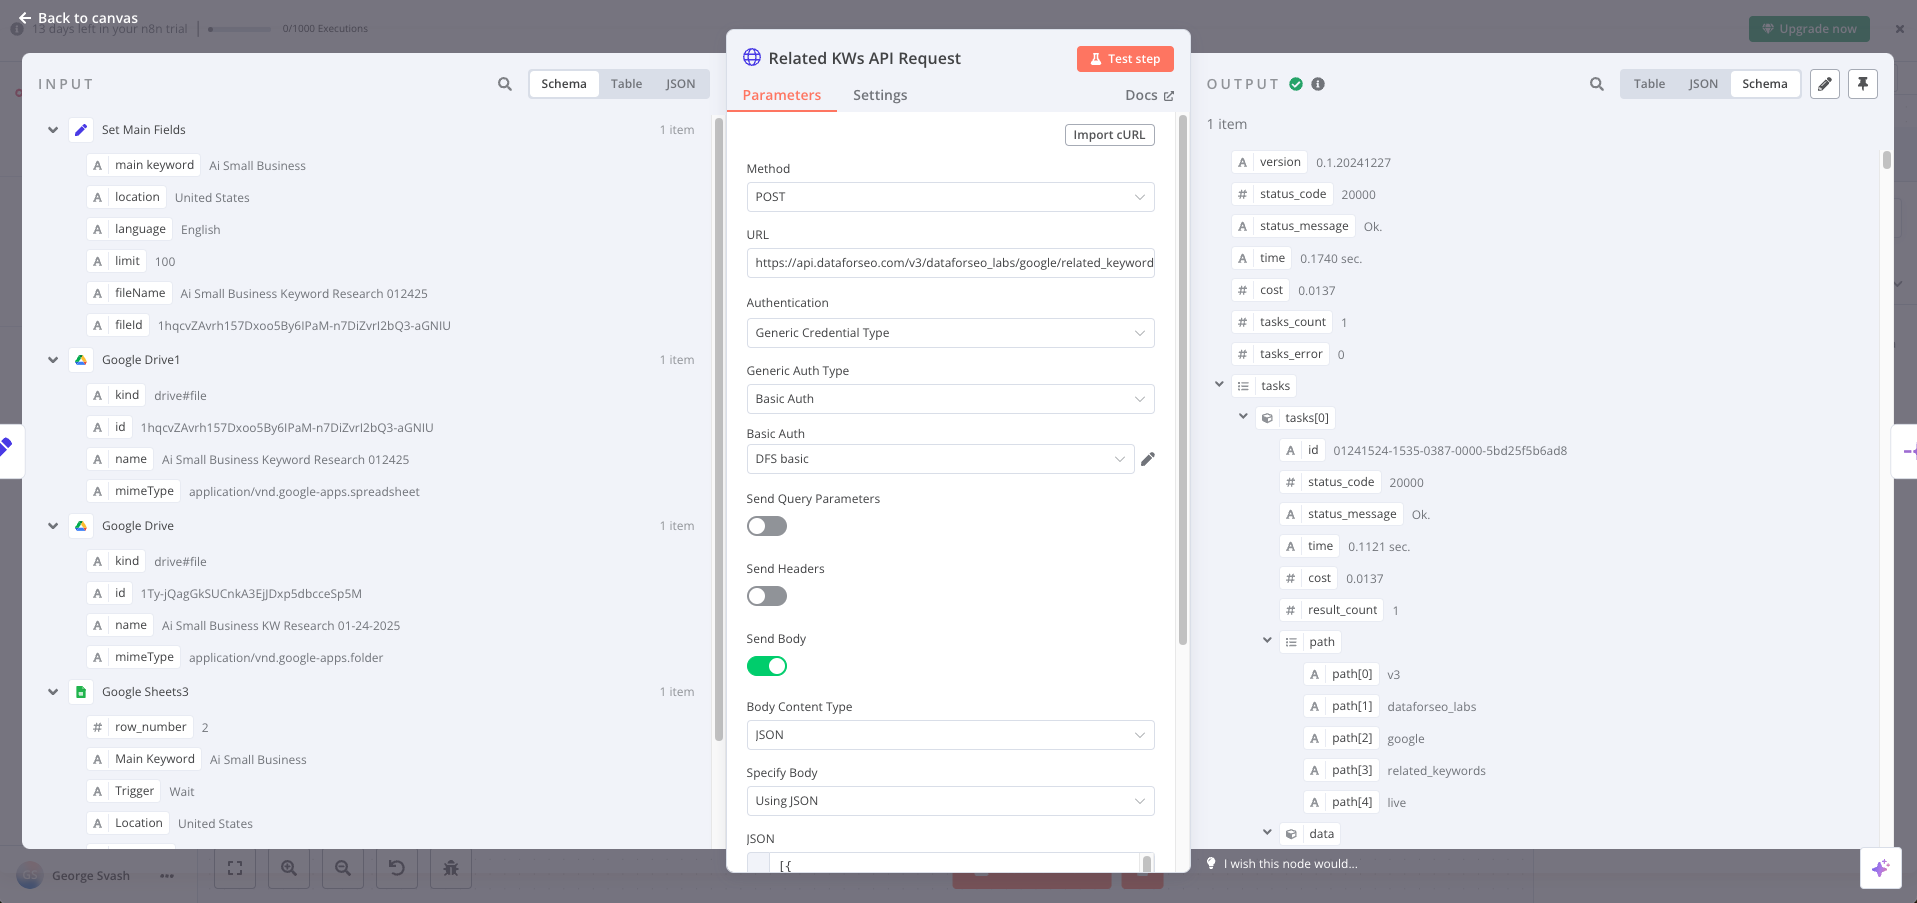
In the “What happens next?” window, find and select the “HTTP request” node. In the node’s window, set the “Method” to “POST” and insert the request URL (check the documentation for the Related Keywords endpoint).
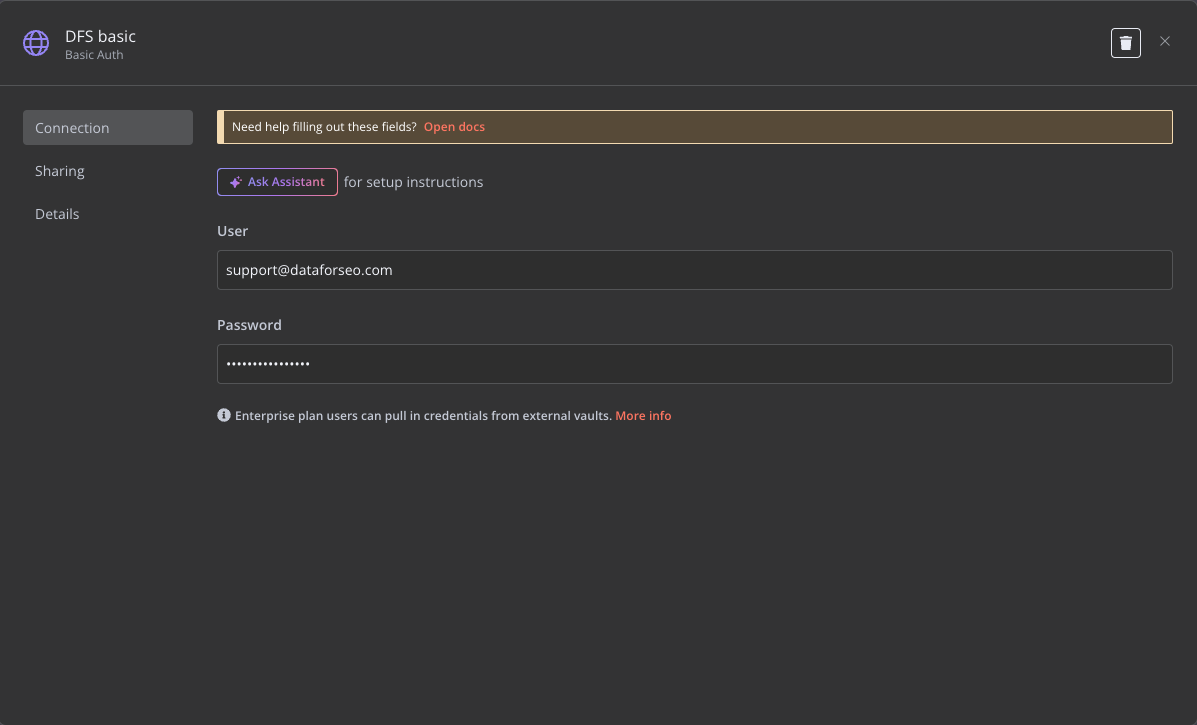
Next, let’s deal with the Authentication. Select “Generic Credential Type” in the “Authentication” field and either “Header Auth” or “Basic Auth” in the “Generic Auth Type” field. The difference between the two is Header Auth would require you to encode your API credentials (see Step 1) in Base64. Either way, after selecting the type of authentication, n8n will ask you to create the credentials in a new window. Just type in your API login and password and give your new Auth a recognizable name.
Note that your API request shouldn’t include any Query Parameters or Headers, so toggle off the corresponding parameters. The only parameter you should toggle on is “Send Body.”
The body of the API request can be easily structured in JSON format, as in the example below:
[{

        "keyword": "{{ $json['main keyword'] }}",

        "location_name": "{{ $json.location }}",

        "language_name": "{{ $json.language }}",

        "include_serp_info": true,

        "include_seed_keyword": true,

        "limit": {{ $json.limit }},

  "depth":2

    }]
2. Split out the results.
If the API request has been executed successfully, the results will start flowing into n8n. Nonetheless, it’s essential to weed out the unnecessary technical fields and keep the valuable data in your spreadsheet.
In the response code of the DataForSEO’s Related Keywords endpoint, the data you need is contained in the items array.
Here’s an example of the response:
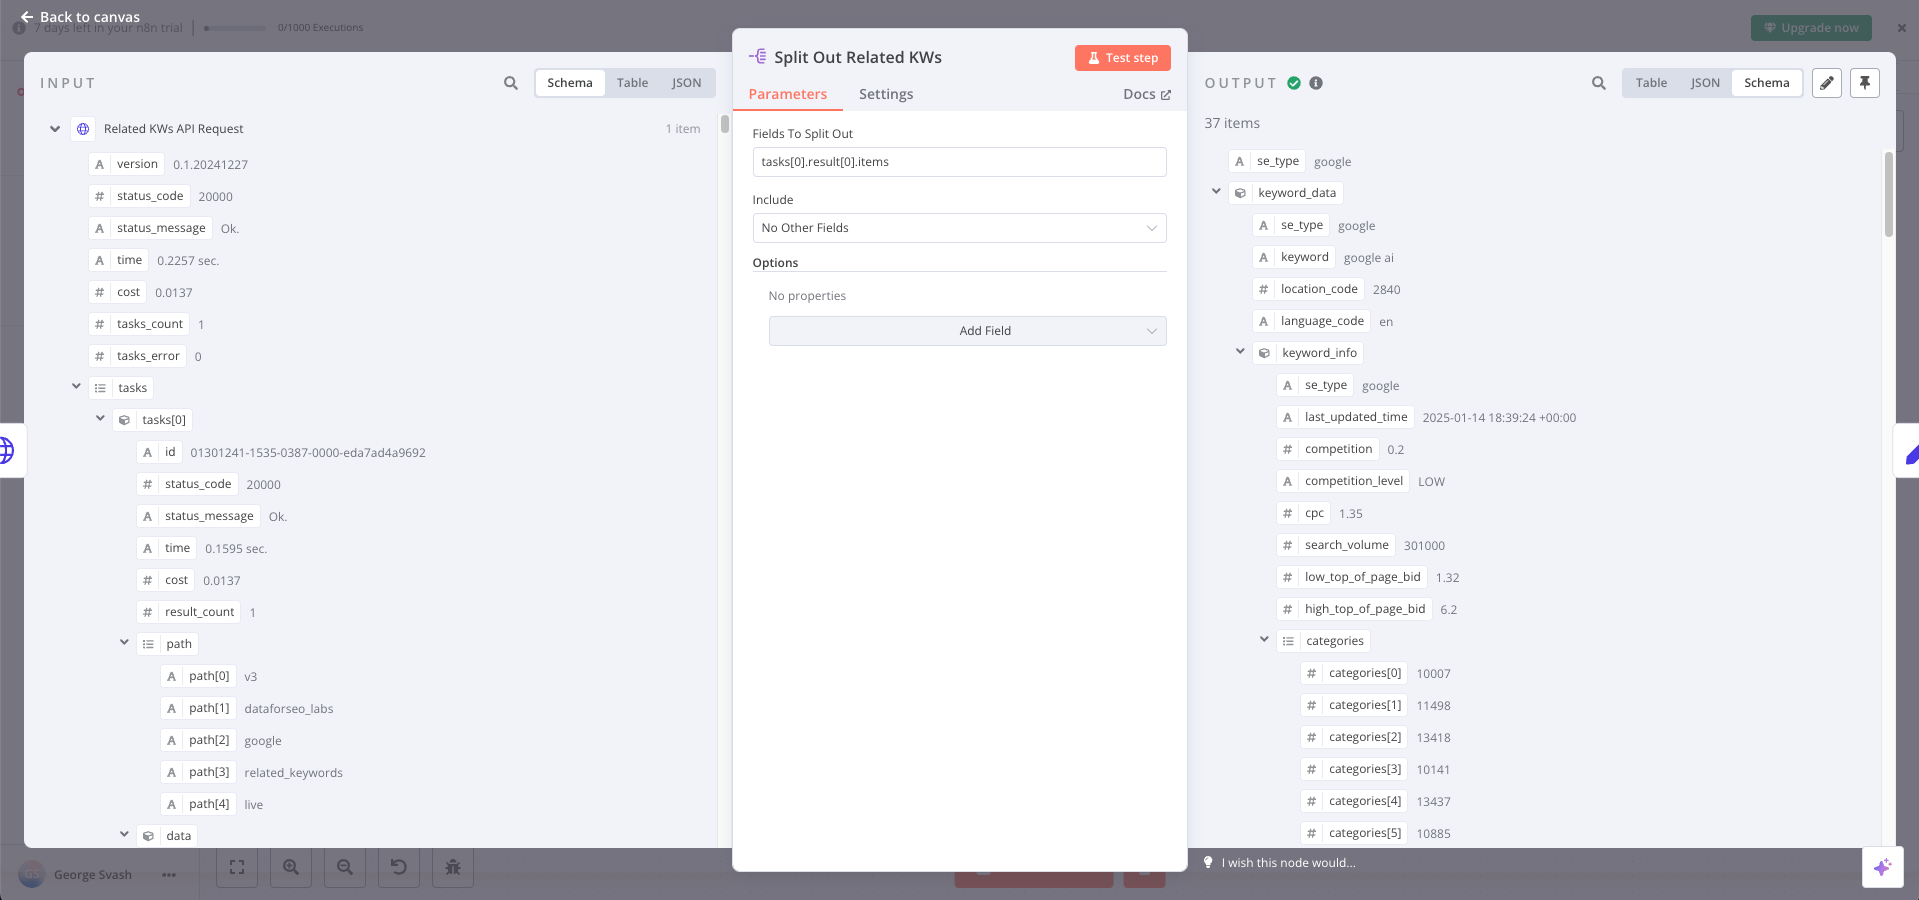
Fortunately, n8n offers a convenient way to split the results with a dedicated “Split out” node, which you can find in the “Data Transformation” section. Indicate that you want to split the items by specifying the following line in the corresponding field: tasks[0].result[0].items
Next, hit the “Test” button to execute the node – you’ll need the output data for the next step.
3. Set Related Keywords’ Fields.
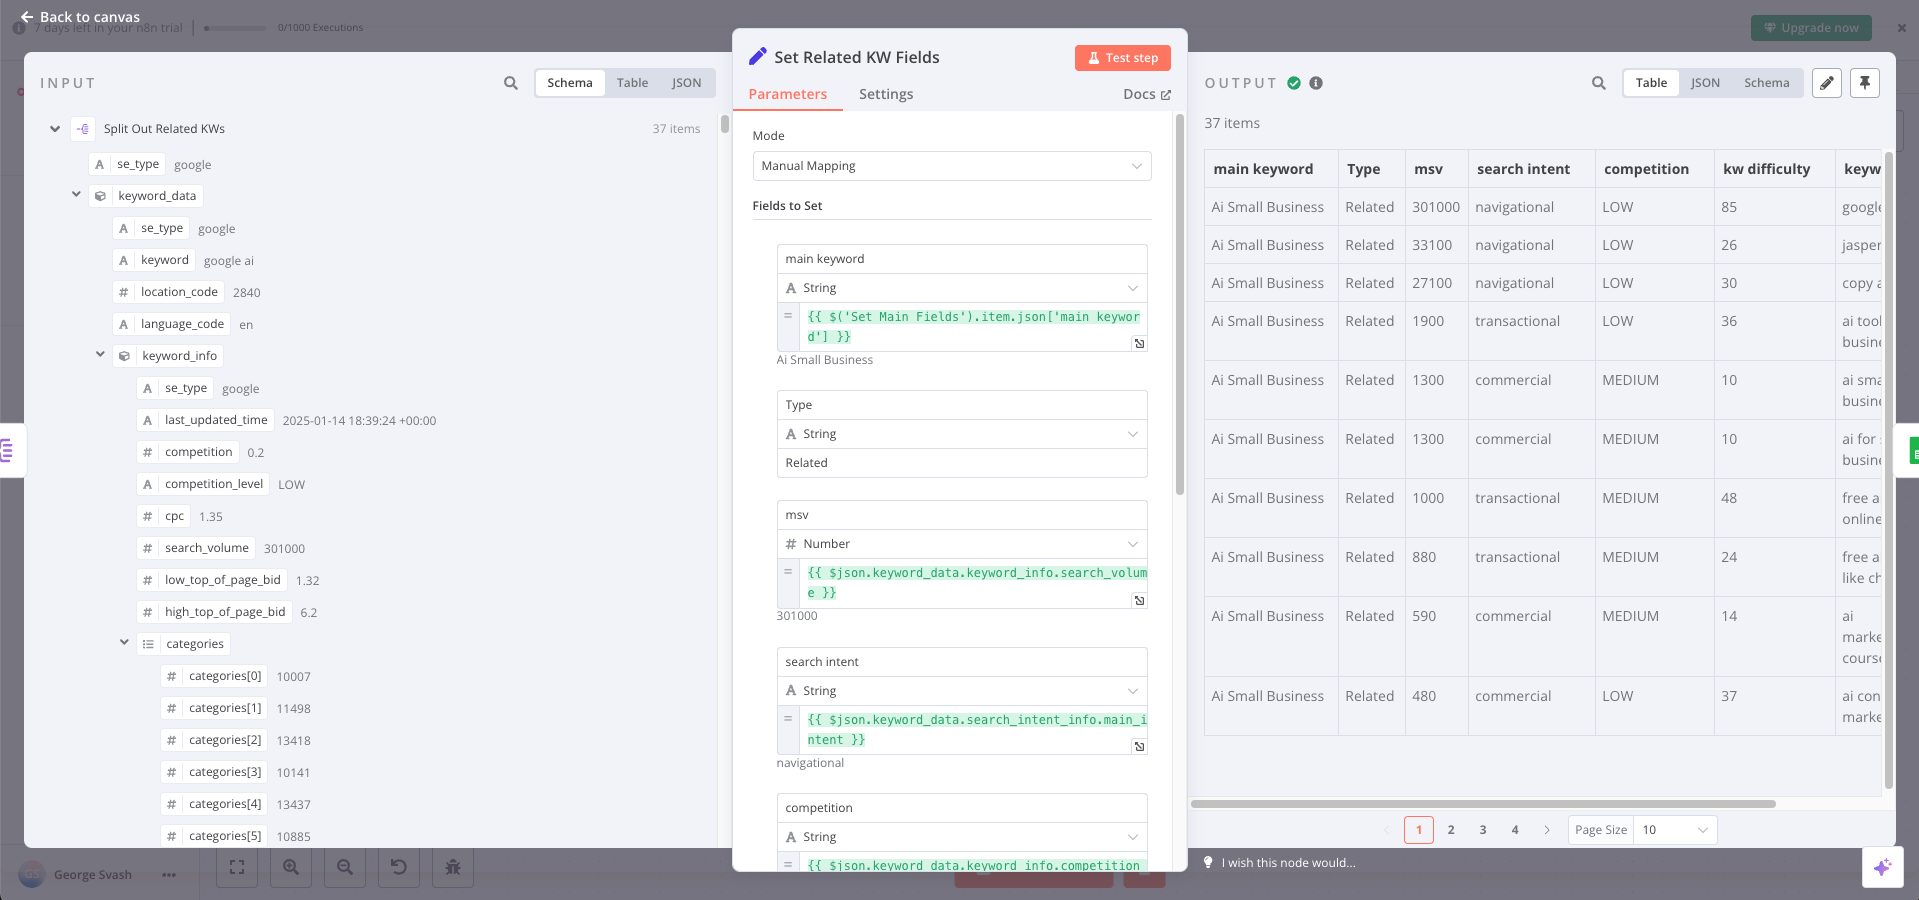
Now it’s time to map the fields you’ve filtered out with the columns of your Google Sheet.
To do that, select the “Edit Fields” node and set the “Mode” to “Manual.” You can simply drag and drop the fields from the “Input” window on the left to the “Fields to set” parameters in the middle.
To make it easier for you, we’ve put together a table with field names, data types, and relevant expressions for each of these fields.
| Field name | Data type | Expression |
| main keyword | string | {{ $('Set Main Fields').item.json['main keyword'] }} |
| keyword | string | {{ $json.keyword_data.keyword }} |
| type | string | related |
| msv (monthly search volume) | number | {{ $json.keyword_data.keyword_info.search_volume }} |
| search intent | string | {{ $json.keyword_data.search_intent_info.main_intent }} |
| competition | string | {{ $json.keyword_data.keyword_info.competition_level }} |
| kw difficulty (keyword difficulty) | number | {{ $json.keyword_data.keyword_properties.keyword_difficulty }} |
| cpc (cost-per-click) | number | {{ $json.keyword_data.keyword_info.cpc }} |
4. Add related keywords to Google Sheets.
This simple step is almost identical to the previous one. This time, we will populate the relevant tab in the Google Sheet with the necessary data.
Create the Google Sheets action and connect with your credentials (see Step 2 for reference). Select “Sheet within document” as your resource. Next, pick “Uppend row” as an operation and drag and drop the document’s ID from the Google Drive node in the left-hand Input panel. In our case, the ID expression for the document looks like this:
{{ $('Set Main Fields').item.json.fileId }}
Then, select the Sheet (or the tab) within the document from the list. In our case, it’s “Related Keywords.”
The most important part of this step is to map the columns in the sheet with the correct data. Again, drag and drop the fields from the previous step to the “Values to send” section of the node.
Step 4: Add the results to the master sheet.
Kudos to all of you who made it this far! This step will ensure you get the results of your keyword research on a single sheet, no matter how many endpoints or data sources you’ve used.
Let’s create another Google Sheets node and connect it with your credentials, just like in the previous steps. Select “Sheet Within Document” as the resource and “Append Row” as the Operation. Then, drag and drop the document ID from the “Set Main Fields” node on the left to the Document parameter, and then pick your master sheet from the drop-down list.
Finally, drag and drop the values from the “Add Related KWs to Google Sheet” node in the Input to the “Values to Send” section.
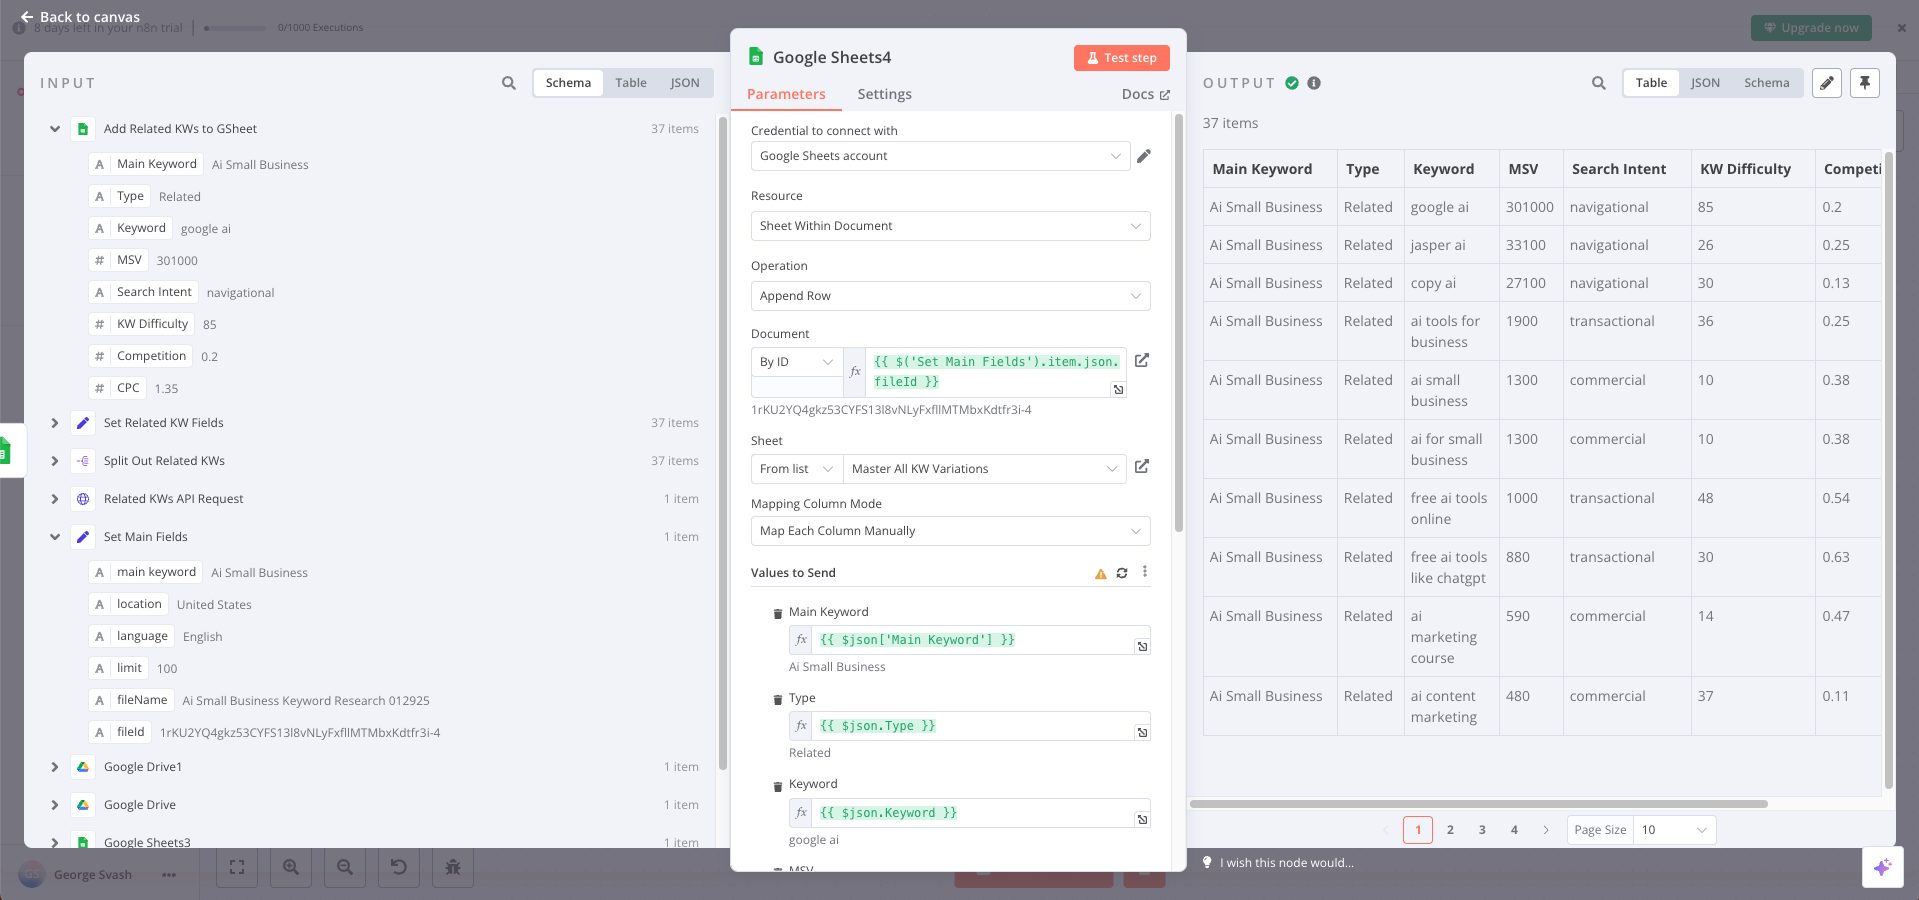
After hitting the “Test workflow” button, you will find the results in a relevant folder on your Google Drive.
Step 5: Add even more data to your keyword research
The n8n platform allows you to add even more data sources to your keyword research. You can easily repeat the process described above with any endpoint of the DataForSEO Labs API.
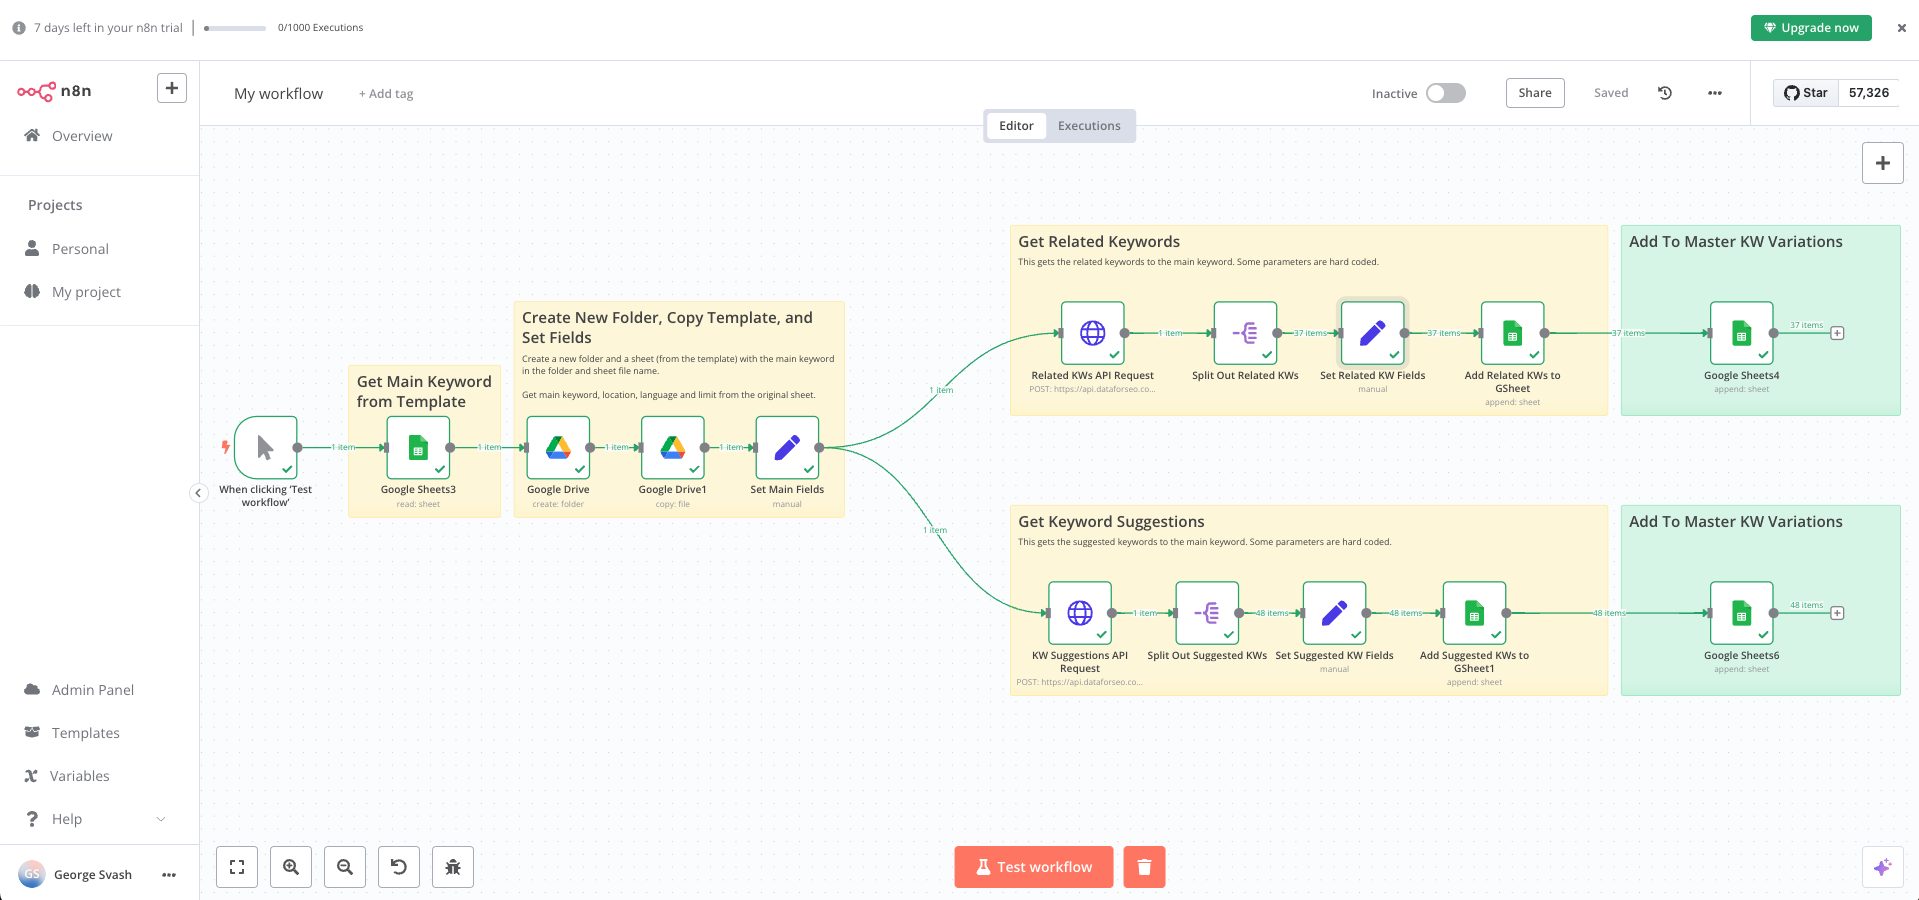
For instance, Wayne’s video shows how to add more data from the Keyword Suggestions endpoint. He copied and pasted the nodes from the Get Related Keywords step and made minimal adjustments to the sheets and fields.
Here’s what the final workflow looks like:
Conclusion
By connecting Google Drive with the Related Keywords and Keyword Suggestions endpoints of DataForSEO API with n8n, Wayne showed us how to get a keyword research tool up and running in a convenient Google Sheet.
For those of you who are unfamiliar with n8n and have little experience with no-code applications in general, we did our best to explain as many details as possible. To make the process even easier for you, Wayne shared a JSON script that you can upload directly to n8n.
So what are you waiting for? Get a DataForSEO account now, and give it a shot!

